Hitbox Studio Pro 1.2.0 User Guide

Getting Started
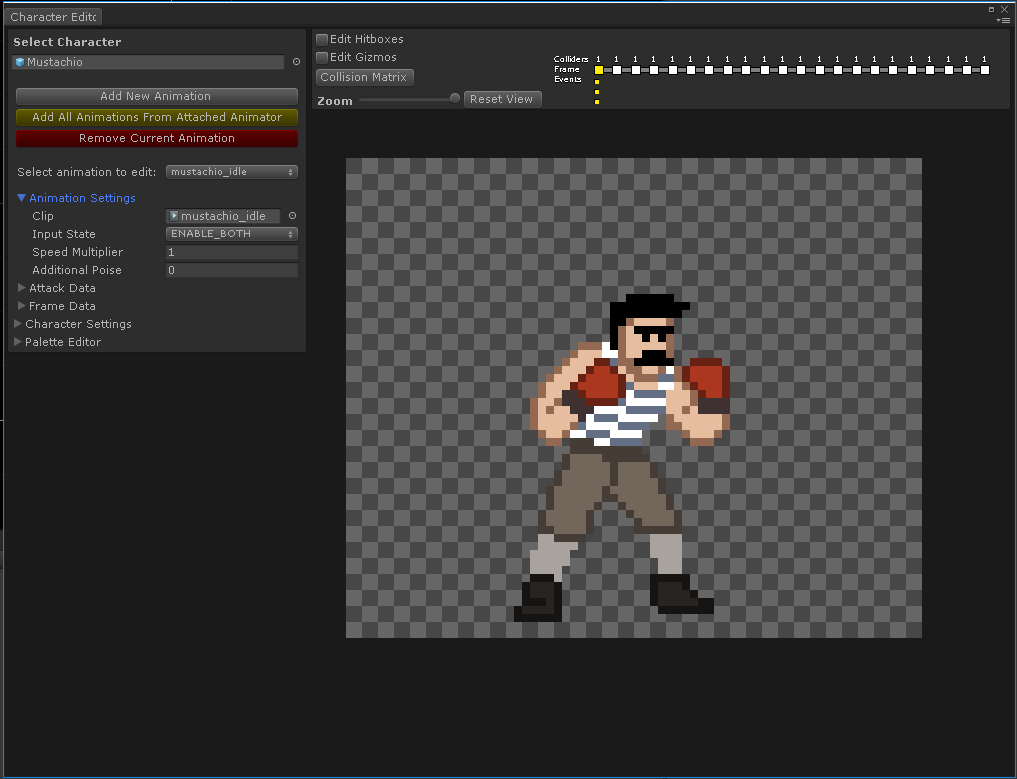
Character Editor Window
Basically everything we will be doing in this guide will take place in the Character Editor window. You can find that in your menu as seen below:

Now let’s examine the character editor:
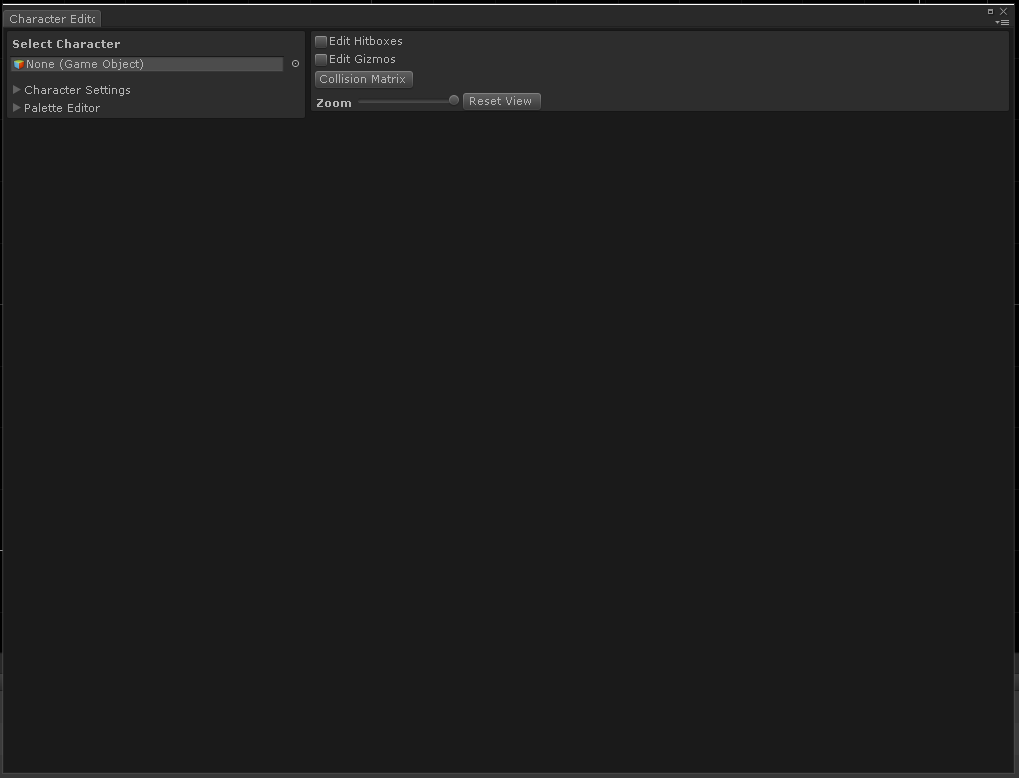
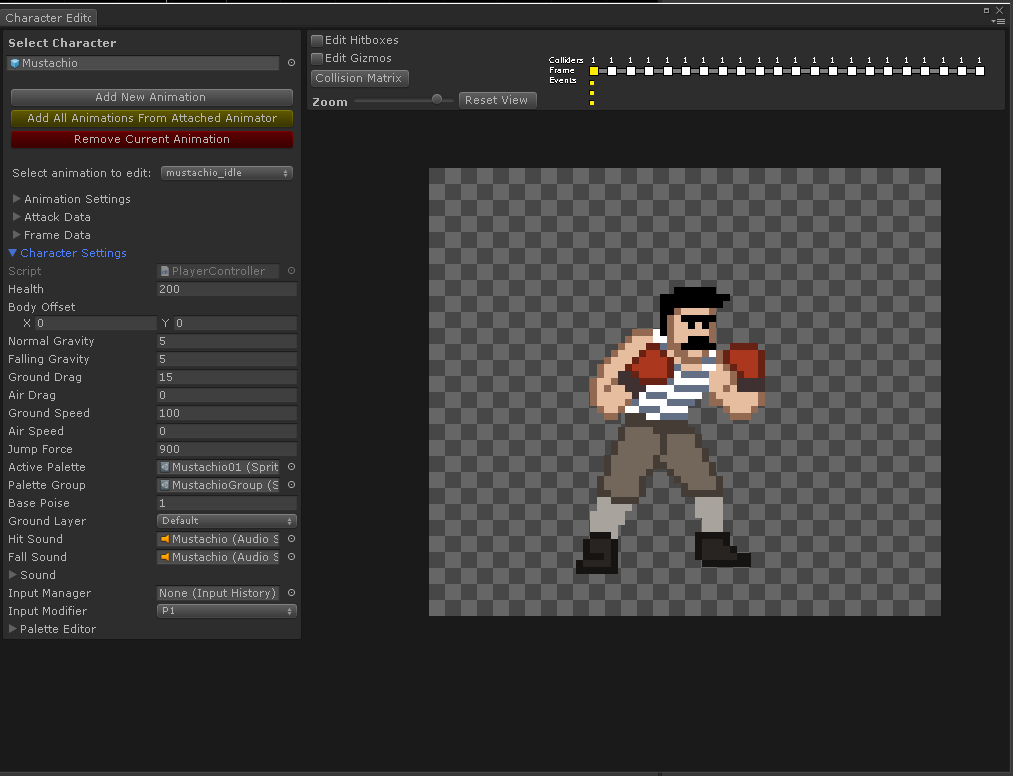
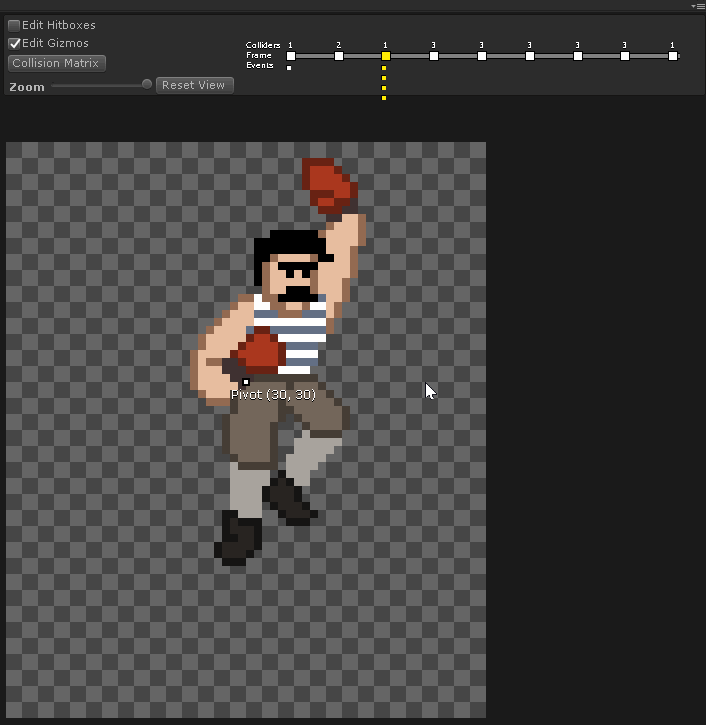
Without a character loaded into the editor there isn’t much going on. So go ahead to the top left of the window and select our demo character “Mustachio”.
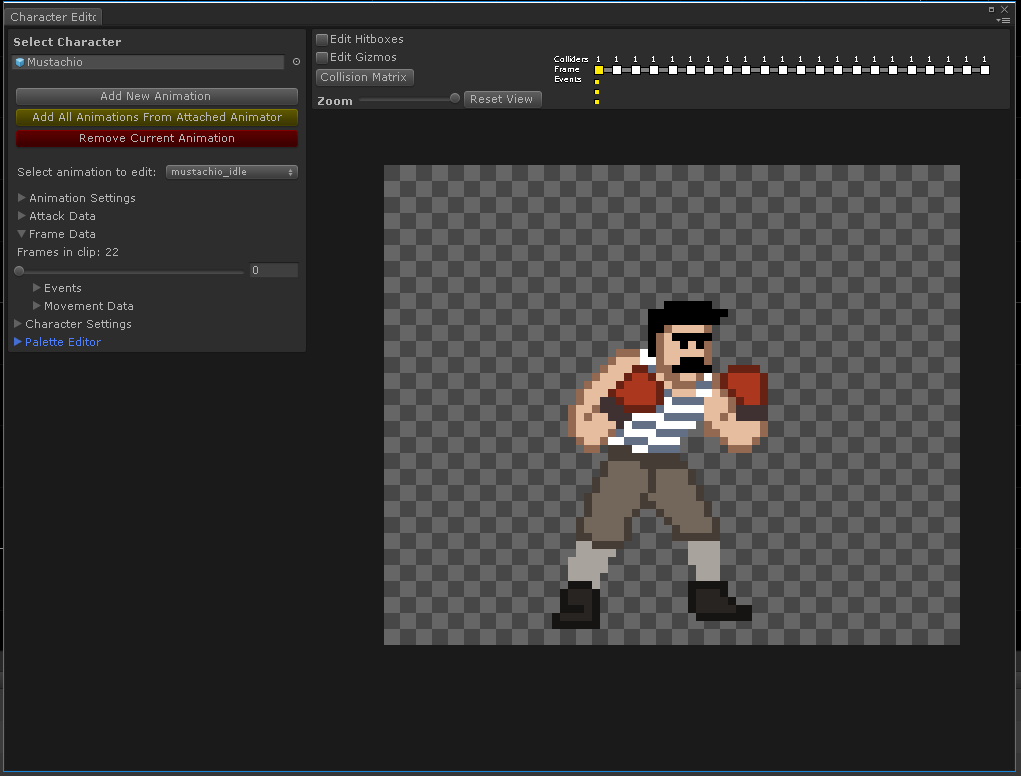
In our Character Editor window we have a number of tools and controls:
- Hitbox Editor
- Gizmo Editor
- Collision Settings
- Animation Timeline
- Animation Settings
- Attack Settings
- Frame Settings
- Character Settings
- Palette Editor
We will be covering these in greater detail in the later sections. After reading the guide, if you haven’t already, play the demo scene provided with the package, then open Mustachio in the character editor, and observe how he is configured.
Running The Demo Scene
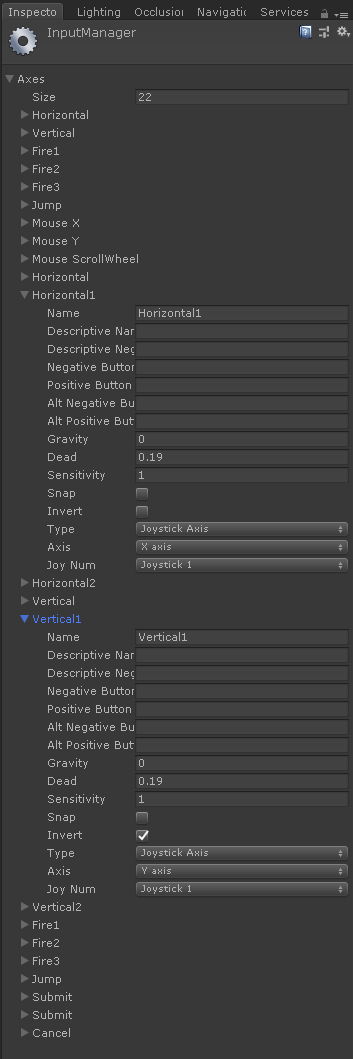
There is only one thing you need to add to your project to run the demo. Because project settings are not included or modified with this package, you must add joystick inputs for player 1 and 2 in your input manager with the following configuration.
- Duplicate “Horizontal” twice
- Name duplicates “Horizontal1” and “Horizontal2”
- Set their “Joy Num” properties to “Joystick 1” and “Joystick 2” respectively
- Repeat the above steps for “Vertical”, making “Vertical1” and “Vertical2”, and assigning their respective “Joy Num” properties.
You can read more about the Unity Input Manager here.
After following the above steps you are ready to play the demo scene.
Setting Up A Character Prefab
The character editor does not work with scene objects; instead it works with character prefabs in your project. In order for your character’s prefab to be compatible with the Character Editor it will need a few components. These components are:
- Animator
- Sprite Renderer
- Hitbox Manager
- Monobehaviour that inherits from ICharacter interface
Additionally, your character should have their animator setup with at least one animation that has keyframes and sprites placed in it.
Setting Up Palettes For A Character
This step is optional and only for developers planning on using our palette editor.
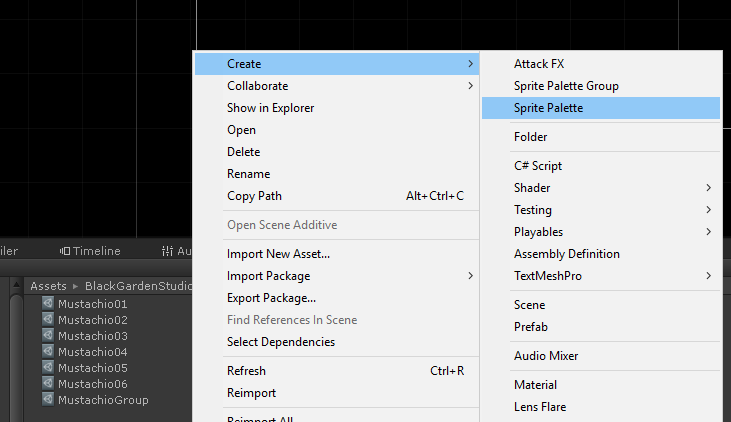
There are three things you will need to provide in order to make your character capable of using palettes.
- PNG containing one of each color preset in your character’s sprites
- Sprite Palette Asset
- Sprite Palette Group Asset
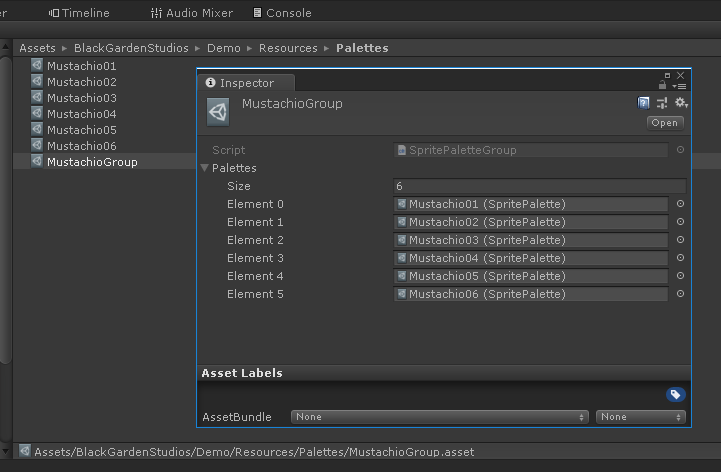
Palette .PNG

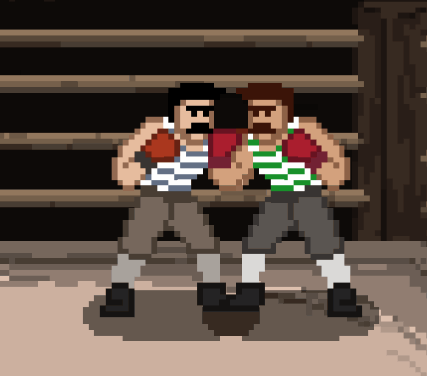
This is an example of the base palette we use for Mustachio. It contains one of each color that is found in all of his sprites. This lets us index your sprite sheets properly so we can later replace these colors. In order for the custom texture importer to index your character’s sprite sheets; you need to place your palette.png in the same folder as your sprite sheets in your project.

Once your palette.png is placed inside the folder containing your character’s sprite sheets you should now reimport the sheets so they will be indexed. Once indexed they will look black, this is OKAY, they will return to normal once in-game and using the sprite-palette material. Indexing the sprite sheets does not modify the originals in your file system; only how they are in Unity.
Palettes and Palette Groups
- Palettes contain all the colors your character is using and
- Palette Groups contain all of the palettes available for your character.
Both of these are created with the asset creation menu in your project view.
Once you have created all of your planned palettes, select your new palette group, go to the inspector, and populate it with said palettes.
Now in your character prefab’s ICharacter component set their Palette Group to the new group you have created and you will be ready to use the Palette Editor!
Using Palettes at Runtime
In order to use palettes on your character at runtime you must use the material located at “Assets/BlackGardenStudios/HitboxStudioPro/Materials/Sprite_Pixel_Snap_Palette” on your character’s Sprite Renderer component. Also you need to assign the palette to the material. You can do that with something similar to the following code found in Mustachio’s Character component.
        public void SetPalette(SpritePalette palette)
        {
            m_ActivePalette = palette;

            if (palette != null)
            {
                var block = new MaterialPropertyBlock();

                if (m_Renderer == null) m_Renderer = GetComponent<SpriteRenderer>();
                m_Renderer.GetPropertyBlock(block);
                block.SetTexture("_SwapTex", palette.Texture);
                m_Renderer.SetPropertyBlock(block);
            }
        }
Setting Up Attack FX
Attack FX can be assigned to attack animations to be played when their attacks land.
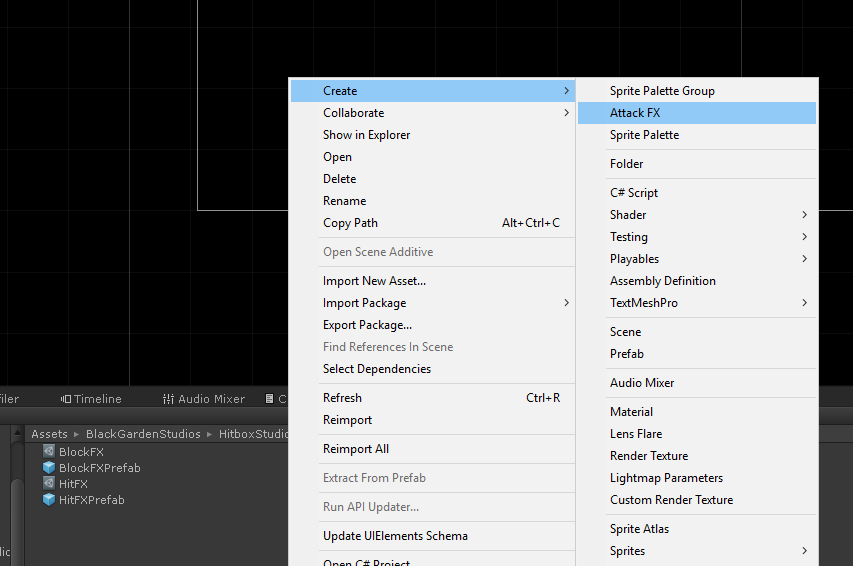
To create Attack FX to show up for selection under Attack Data: go to your Resources/Effects folder, right click, and select Create Attack FX.
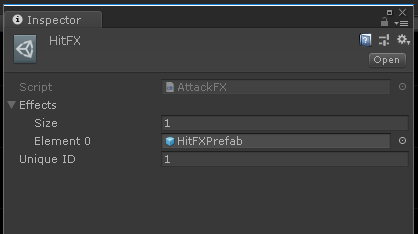
Attack FX assets only contain an array of prefabs (of attack effects you create) and a unique identifier you give it. Add more than one prefab to the array if you want these effects to act as a group where only one is randomly selected. The unique identifier should be greater than zero. Attack FX are sorted by their unique identifier in the editor UI.
When adding Attack FX to your animation’s Attack Data only the unique identifier is passed to the HitboxContact event. You can use the EffectSpawner class or derive your own way to spawn your effects.
EffectSpawner.PlayHitEffect(data.fxID, data.Point, m_Renderer.sortingOrder + 1, !data.TheirHitbox.Owner.FlipX);
ICharacter Interface
The Character Editor and run-time Hitbox Manager need a few things from your character to work correctly. If you already have a player or character class started in your project, simply inherit the BlackGardenStudios.ICharacter interface.
    public interface ICharacter
    {
        SpritePalette ActivePalette { get; }
        SpritePaletteGroup PaletteGroup { get; }
        float Poise { get; set; }
        bool FlipX { get; }
        void HitboxContact(ContactData data);
    }
- ActivePalette should be currently active palette applied to your character
- PaletteGroup should be the palette group your character is using.
- Poise, if you’re using it, will have set called whenever an animation is marked as giving additional poise. You should be saving this temporary poise in a seperate field and when get is called: return your character’s base pose PLUS their temporary poise.
- FlipX should return whether or not the character is facing their default direction. false = original direction, true = flipped horizontally.
- HitboxContact will be covered in more detail in the next section. This is where you will be receiving hitbox events whenever hitboxes intersect.
For users who have yet to create a Monobehaviour class for their character or player:
Please see the following example classes in the demo code to get started:
- BlackGardenStudios.Demo.Character
- BlackGardenStudios.Demo.PlayerController (child class of Demo.Character)
However you choose to setup your Monobehaviour that inherits ICharacter, you can find all of it’s serialized properties under “Character Settings” in the Character Editor.
Receiving Hitbox Events
Whenever two valid hitboxes intersect: HitboxContact(data) will be called.
Your ICharacter inherited class must implement
public void HitboxContact(ContactData data);
So what is the data we are getting? Let’s open the ContactData struct and find out!
        public struct ContactData
        {
            public HitboxFeeder MyHitbox;
            public HitboxFeeder TheirHitbox;

            public float Damage;
            public float PoiseDamage;
            // Identifier of the hit effect this attack uses.
            public int fxID;
            // Amount of force to receive from this attack
            public Vector2 Force;
            // Intersection point between these two hitboxes.
            // Place a hit effect at this location.
            public Vector2 Point;
        }
Pretty straightforward stuff but what does MyHitbox and TheirHitbox contain for us?
    public class HitboxFeeder : MonoBehaviour
    {
        public ICharacter Owner { get; }
        public BoxCollider2D Collider { get; }
        public HitboxType Type { get; }
        ...
    }
So everytime two hitboxes intersect, we know who was hit, for how much damage, how far he may have been pushed, where the intersection took place, and who hit them! Not every time an intersection has taken place does it necessarily mean a character has taken damage. Based on the both hitbox types you will want to handle that intersection differently.
Take a look at the following example:
        public void HitboxContact(ContactData data)
        {
            switch (data.MyHitbox.Type)
            {
                case HitboxType.TRIGGER:
                    {
                        OnHitReceived(data.Damage, data.PoiseDamage, data.Force);
                        EffectSpawner.PlayHitEffect(data.fxID, data.Point);
                    }
                    break;
                case HitboxType.GUARD:
                    {
                        OnGuardReceived();
                        // I don't really care what their hit effect is.
                        // I want to play the guard effect since we guarded it.
                        EffectSpawner.PlayHitEffect(2, data.Point);
                    }
                    break;
                case HitboxType.HURT:
                    if(data.TheirHitbox.Type == HitboxType.TRIGGER)
                        OnAttackHit();
                    else if(data.TheirHitbox.Type == HitboxType.GUARD)
                        OnAttackGuarded();
                break;
            }
        }
For the full list of the default hitbox types see below:
        public enum HitboxType
        {
            TRIGGER,
            HURT,
            GUARD,
            ARMOR,
            GRAB,
            TECH
        }
You can freely rename, add, or remove types as you see fit for your project. The Hitbox Editor will automatically include all types from the HitboxType enum. Later on in the Collision Matrix settings we will see how to control what types will fire events when intersected by others.
Receiving Animation Events
Every event you add to your character in the Character Editor will call a method of the same name with the prefix EVENT_. This event can have no parameters, an int parameter, a float parameter, a string parameter, or any combination using an AnimationEvent parameter. It’s entirely up to you how you want to handle the event. In the following example: I added the PLAY_SOUND event to frame 5 to give his kick a whooshing sound when he fully extends his leg. I set the Int Param to 1 because that is the ID I set the sound too.
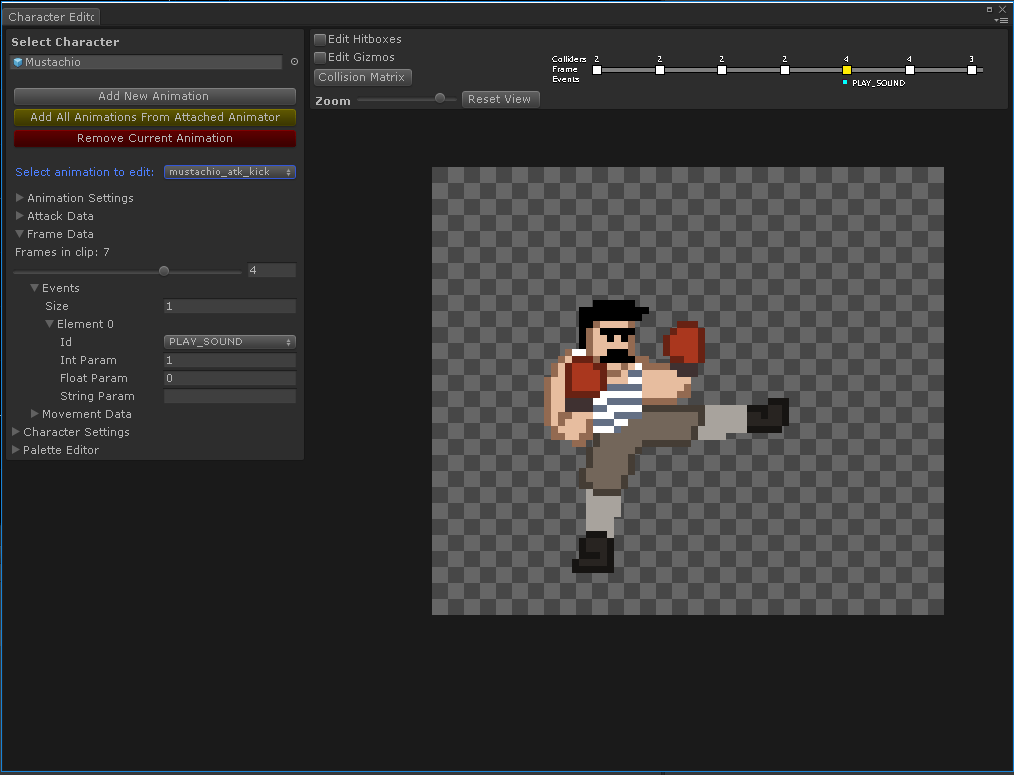
Now to handle that event, on Mustachio’s ICharacter component I will add the following code:
        public void EVENT_PLAY_SOUND(int index)
        {
            if (index < 0 || index >= m_Sound.Length) return;

            m_Sound[index].Play();
        }
A more advanced event is the PROJECTILE event. When a projectile event is selected the Int Param and Float Param are calculated automatically and should not be entered in manually. That is because you use the drag and drop arrow gizmos to define both the origin and direction of the event.
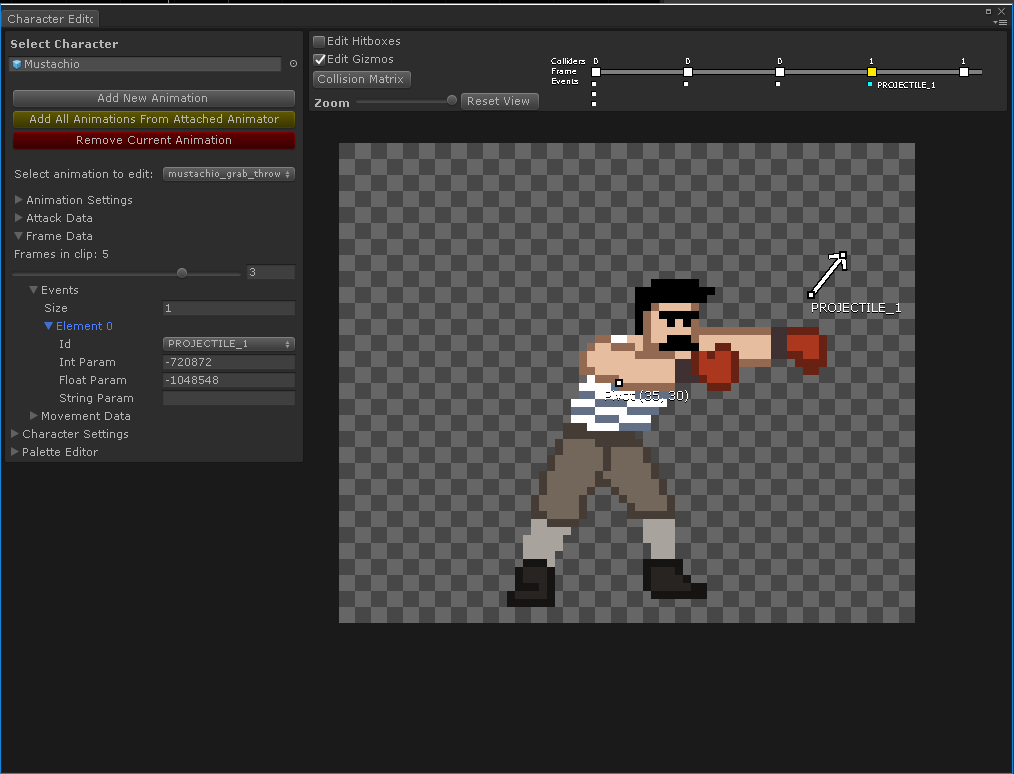
To handle this event we’ll need the aid of a helper function to decode the parameters and give us our origin and direction vectors. See the example code below:
        public void EVENT_PROJECTILE_1(AnimationEvent e)
        {
            Vector2 origin, direction;
            m_HitboxManager.DecodeOriginAndDirection(e.intParameter, e.floatParameter, out origin, out direction);

            // If our character isn't facing their default direction we need to flip our X coordinates.
            if(FlipX)
            {
                origin.x *= -1f;
                direction.x *= -1f;
            }
            // Add our characters world position to the origin to get the origin's world position.
            origin += (Vector2)transform.position;
            // Now we have our origin and direction vectors. Let's throw our opponent.
            ...
            ...
        }
Using The Character Editor
Adding Animations
Adding animations to your character prefab is pretty straight forward. There are two buttons in the top left of the Character Editor to facilitate this.
Either:
- Add New Animation – Opens a dialog to select the animation from somewhere in your project. The animation must be a valid animation inside your asset folder.
- Add All Animations From Attached Animator – This will automatically grab all the animations attached to this character’s Animator component. It will not create duplicates of animations previously grabbed so feel free to smash this button whenever new animations are added to your character’s Animator Controller.
Animation Configuration
Only a few fields for per-animation settings.
- Clip – The animation clip this animation is using.
- Input State – This is an animation event handled by your ICharacter component. Dictating whether or not your players inputs should be restricted. These input state events are fired at the beginning of the animation.
- Speed Multiplier – This is an animation event handled by your ICharacter component. The event name is EVENT_SET_SPEED and has a float parameter. Mustachio uses this as a multiplier for his base walk speed. It is up to you how to interpret this.
- Additional Poise – When the animation starts, your character’s Poise property will have this value set to it.
Attack Configuration
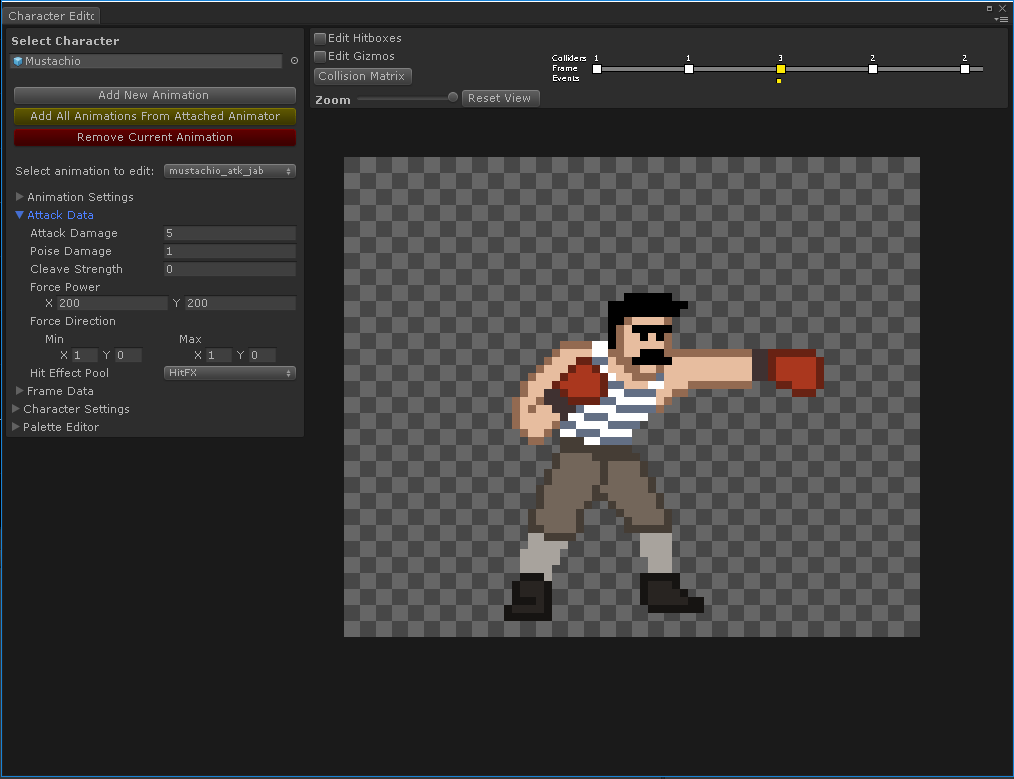
- Attack Damage – Amount of damage this attack will deal to enemy’s health.
- Poise Damage – Amount of damage to deal to enemy’s poise.
- Cleave Strength – Number of enemies this attack can hit.
- Force Power Random(X – Y) – Amount of force to apply to enemy on hit. Random from X to Y.
- Force Direction Random(minXY – maxXY) – Direction of force, random from Min to Max.
- Hit Effect Pool – What hit fx should this attack spawn if it hits?
Frame Configuration

- Movement Data – With these fields you can move your character’s position (in pixels) per frame. A scenario this could be used is an animation where your character is climbing a ledge.
- Move By (X, Y) – Amount of pixels to move this character this frame on the X and Y axis.
- Smoothed Move – If true: smooth this movement between this frame and the next frame in the animation.
If false: perform this move instantly.
- Repair Unordered Frames – On rare occasions an animation in Unity might be saved with it’s keyframes out of order. Use this button to properly sort the frames by time.
Using The Timeline
From the timeline you can quickly see how many hitboxes and events a frame in your character’s animation has.

To preview the events in a frame: simply hover your mouse over the event block and the event ID will appear. If you want to delete the event you can right click the event directly like so:

Adding events to a frame is simple. Right click on the frame you want to add an event to and right click. A menu will appear with all of the event IDs available. You can add new events types if you need to.

To edit an animation event left click on the event you want to modify and it will appear in the unity inspector.

Editing Hitboxes
Hitbox editing uses a very simple drag and drop interface. To start creating or modifying your character’s hitbox: click the “Edit Hitboxes” checkbox as shown below.

To create a new hitbox just right click, select a hitbox type, and drag away!

If you need to change a hitboxes type you can right click on it and change it’s type as shown below:
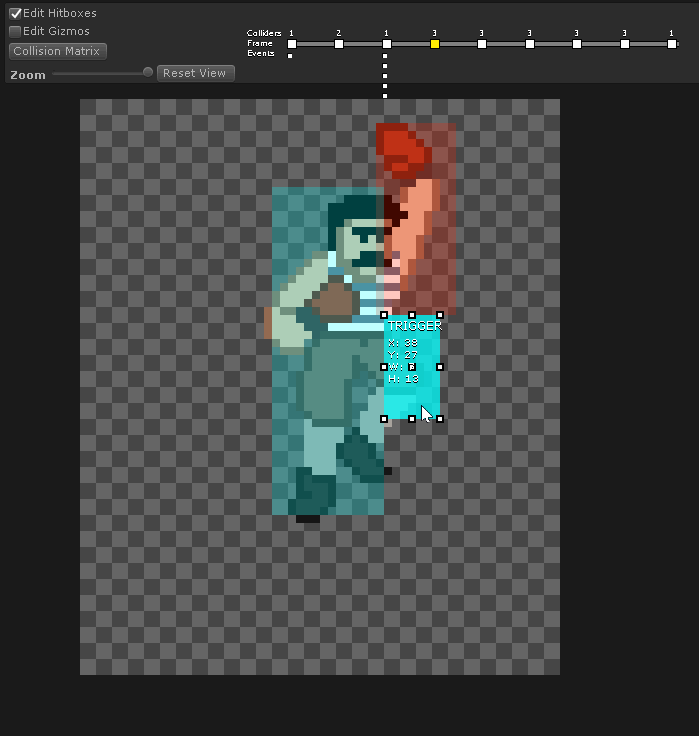
Copying and pasting hitboxes is also supported from the right click menu. You can copy individual hitboxes, all hitboxes in the current frame, or copy hitboxes over from surrounding frames.
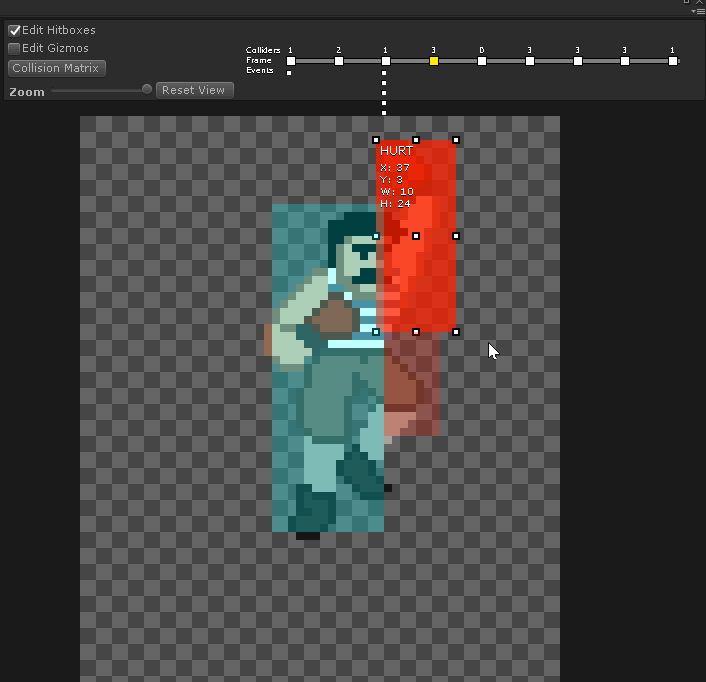
Copying hitboxes from surrounding frames will not create duplicates. Hitboxes that are in the same position and have the same size will not be copied over.
For more static animations like an idle animation you might not want to update the hitboxes for that character every frame. By middle clicking a frame in the timeline you tell the character to keep any hitboxes it already has from the previous frame. Frames that will skip a hitbox update display their collider count as “>” in the timeline.

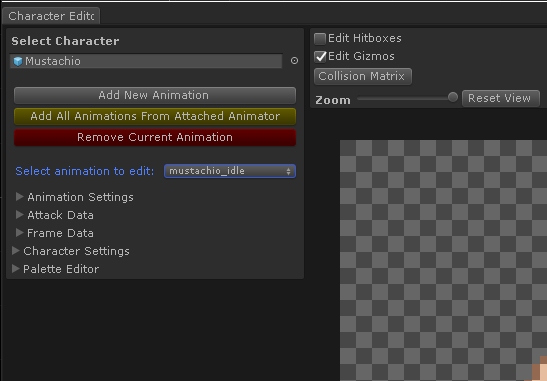
Editing Gizmos
In order to see your gizmos and move them you must be in gizmo editing mode. To switch to gizmo editing check the “Edit Gizmos” box at the top of your editor window.
There are two types of gizmos you will be dragging around in this mode:
- Pivots – The pivot point of your sprite that you would typically manage in Unity’s sprite editor

Moving the pivot back where it belongs - Arrows – A gizmo with 2 points that encodes your PROJECTILE event with origin and direction vectors automatically as you move it. All events contain PROJECTILE in it’s ID will add an Arrow gizmo to that frame. You may manage multiple Arrows in a single frame.

Setting the uppercut’s launch trajectory

Using The Animation Editor
With the Animation Editor you can quickly compose or edit existing sprite animations. This tool provides quick and basic functionality to control framerate, number of samples, and looping.
You can find the Animation Editor here:


Advanced Configuration
Hitbox Settings
The settings window lets you define animation events, hitbox types, hitbox colors, and define how hitboxes will interact with each other.
Settings is one button press away at the top of your editor window.

After adding or removing hitbox types and applying changes you will likely have to reconfigure your collision matrix entirely. If you don’t have a good memory take a screenshot of your old collision matrix before applying changes to hitbox types.
Using the Collision Matrix you will decide which characters receive events when certain types of hitboxes intersect and whether or not it fires any events at all.
When placing hitboxes we know that we won’t care if some types ever intersect. For example we don’t care if two character’s have their guard boxes intersect. So in our collision matrix we make sure the Guard⨯Guard is left blank so we will not receive events if they ever intersect. In the collision matrix toggle boxes we can configure a hitbox pair to have no events sent, one event sent to either side, or both sent an event.
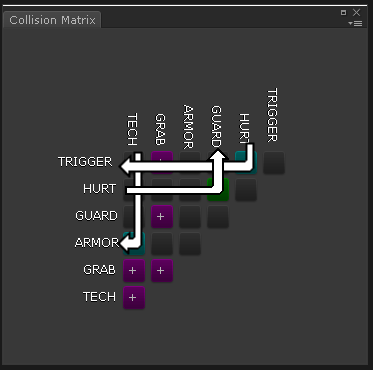
In the demo GRAB is setup as a two way event with itself. This is so when two players grab each other at the same time we want to cancel the grab and stagger both players.
Because these hitboxes are still using Unity’s physics system; if you are making an action RPG with a lot of enemies and you don’t want enemies to hit each other, you can put those enemies on the same physics layer where none of their colliders will collide with each other. You can also use your physics layers to setup teams or factions for your characters and disable friendly fire for those characters.
Adding New Events
See Hitbox Settings
Some of these events are used by the HitboxManager component directly and should not be removed. These events are:
- RESET_TARGETS – Resets a character’s hitbox intersection history. Simply put let’s the same attack hit an enemy again every time this event is called.
- SET_POISE_DAMAGE – Sets the amount of poise damage this attack will deal for the current frame.
- SET_ATTACK_DAMAGE – Sets the amount of damage this attack will deal for the current frame.
